
Sierra Wireless EM7345: How to flash the latest firmware
WARNING!!! The instructions in this post are applicable only to EM7345 installed in Lenovo laptops!! For example, models T440, X240, X1 Carbon 2nd and 3rd gen, X250. For tablets or other devices don’t use the firmware given in this post, you can brick your EM7345!
Unfortunately, the default factory EM7345 firmware version (1.1) has some bugs. For example, after connecting to a LTE network and then disconnecting manually, the network status of the connection was changing for me to “No service” until device restart. Also, the device often disappears from Device Manager and reappears there with the name “1 CDC” and does not work until you disable and then enable it again in Device Manager. All those issues are caused by some bugs in EM7345 firmware.
But there is a newer version of firmware, namely 1.2, where the above bugs are fixed. But by default, you cannot flash it, because firmware updating is supposed to work unattended. And this is not nice of Intel and Lenovo. The users must be able to do firmware updating when they need or want it!
Make sure you’re using Windows 8 or 8.1
Go to the control panel and uninstall Sierra Wireless EM734x 4G LTE Software from Program and Features.
Reboot your laptop.
Download and install the latest EM7345 driver package from the Lenovo website. https://support.lenovo.com/us/en/products/laptops-and-netbooks/thinkpad-t-series-laptops/thinkpad-t440/downloads/DS040771. This package already includes the 1.2 firmware, but by default it’s never going to be flashed into your EM7345, unless you live in some specific country.
Find the file c:\ProgramData\Intel\MBIM Toolkit\config\Config.xml and open it in any text editor. Find the following
string in the file:
Make sure after you edit the file contents is the following:
<?xml version="1.0" encoding="UTF-8"?>
<Config>
	<EmailTo>
	</EmailTo>
	<EmailSubject>
	</EmailSubject>
	<!-- Location of where the trace file will be stored -->
	<TraceDir>%USERLOCALDATA\temp\TraceApp</TraceDir>
	<!-- Trace level can be any number between 1 - 9 -->
	<TraceLevel>1</TraceLevel>
	<!-- EnableTracelevel true = show trace level in GUI. Works only in Windows 8, not in
     Windows 7 -->
	<EnableTraceLevel>false</EnableTraceLevel>
	<!-- Location of where the firmware database is located. -->
	<CustomFirmwareDatabase></CustomFirmwareDatabase>
	<!-- 0 - turn off Application logging. 1 - turn on  Application logging -->
	<AppLogging>1</AppLogging>
	<!-- Max size for debug logger file -->
	<AppLogSize>4096000</AppLogSize>
	<!-- Resource file with translated string table -->
	<ResourceFile>Resource_en-us.xml</ResourceFile>
	<!-- Silent Auto Firmware Update -->
	<SilentAutoFWUpdate>false</SilentAutoFWUpdate>
	<!-- Prompt Silent Auto Firmware Update failures, this configuration is only applicable if 'SilentAutoFWUpdate' is true -->
	<PromptForSilentAutoFwUpdateFail>true</PromptForSilentAutoFwUpdateFail>
	<!-- Enable Firmware System Tray. Default is true to enable -->
	<FirmwareSysTray>true</FirmwareSysTray>
</Config>
Now, reboot your laptop.
After reboot, you will notice a new icon in the system tray for Intel firmware updater service:
Don’t proceed if you don’t see this icon.
Double click the icon to bring up the Intel firmware updater utility:
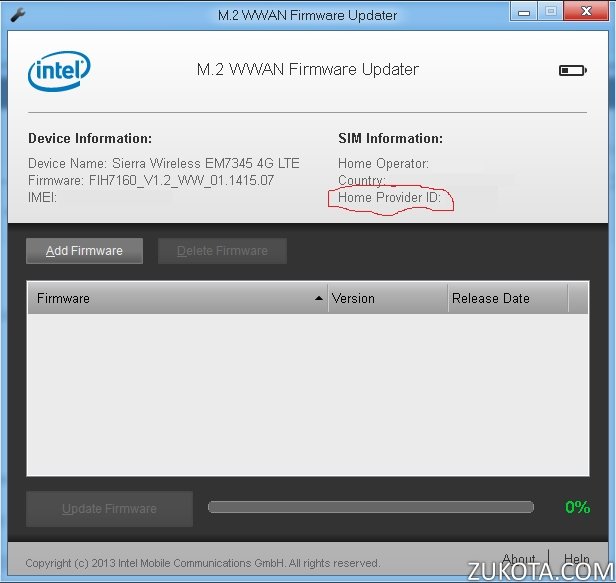
Notice the highlighted area. You should see your country and cellular operator listed there. Also check “Home Provider ID” value. It should contain a 5-digit code, for example “26299”. If you don’t see any data shown, make sure your SIM card is inserted and you can see your cellular provider name in Windows 8 Connections Manager.
Don’t proceed if you don’t see Home Provider ID, your county and your operator name!
Now, find and open in a text editor the following file: c:\ProgramData\Intel\MBIM Toolkit\FirmwareDatabase\PreInstalled\FLSInformation.xml. Scroll to the very end of it and before string insert the following text:
	<FLSImage name="FIH7160_V1.2_WW_01.1415.07_NAND.fls">
		<MCC>262</MCC>
		<MNC>99</MNC>
	</FLSImage>
where MCC is the first 3 digits of the code shown in “Home Provider ID”. If your code is 26299, then MCC must be 262. MNC is the last 2 digits of the code, if your code is 26299, then your MNC must be 99.
Make sure the end of the file with your added data looks like this:
	<FLSImage name="FIH7160_V1.2_WW_01.1415.07_NAND.fls">
		<MCC>262</MCC>
		<MNC>99</MNC>
	</FLSImage>
</FLSImageList>
Save the file and reboot your laptop.
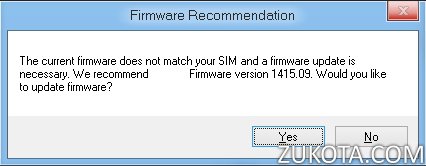
After reboot, wait for some time until you get a prompt from Intel firmware updater to update your firmware. Press “Yes” and the firmware update progress will begin!
It should complete in a few seconds, maybe 10-20. After the process is done and the updater says so, wait for a couple of minutes. Don’t reboot your laptop.
After the updating is done, your EM7345 can appear in Device Manager with a different name, and AT and GNSS ports can be gone, and VID/PID can be reset again to bad values. You will need to reinitialize your EM7345 again, as described in this post. If you want to also get back your AT and GNSS ports, refer to this post.
If you have AT ports enabled, check the version of firmware:
AT+XGENDATA
+XGENDATA: "    FIH7160_XMM7160_V1.2_MBIM_GNSS_NAND_REV_4.5 2014-Jun-5 11:54:58
                                                                               FIH7160_V1.2_WW_01.1415.07*"

"*"

OK
The version should read as 1.2 now. If so, you have successfully updated your EM7345 to the latest available firmware. I personally noticed that “1 CDC” bug is gone, and LTE connecting and reconnecting works fine now. I also can observe a very rare bug when my EM7345 is shown with an exclamation mark in Device Manager after the laptop wakes up from sleep, but I use to fix that by disabling it in Device Manager and enabling it again. Other than that, there are no bugs and LTE works like a charm 🙂